Remove the decorative cap on each handle using your chosen screwdriver. Place the parts in order as they are removed to make reassembling the faucet easier.
Plug the drain and turn off the water supply valve to the dripping faucet. Remove the escutcheon cap by lifting it and unscrewing it. Soak the disk cylinder in calcium remover or white vinegar. Visit https://www.plumbing-express.com/ to learn more.
Dripping faucets are an annoyance that can add up over time, and one that often results from the O-ring or washers inside the assembly wearing out. These can be replaced easily, but it’s important to shut off the water supply before you start working — not only to prevent flooding but also to ensure that the faucet is completely dry when you reassemble it.
Look for the fixture shutoff valves under your sink and turn them off. If your house is on a well, you’ll have to disconnect the water from the main line to turn off your sink. If you’re unsure of how to do this, contact a professional plumber.
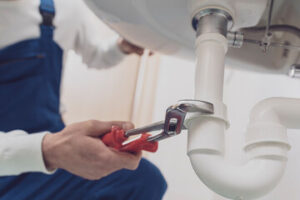
Before you proceed with a faucet repair, make sure you have all of the tools needed to take off your handle and disassemble the rest of the faucet. This includes a flathead screwdriver and possibly a hex wrench or allen wrench depending on your faucet’s setup. If the screws are corroded or seized, you may need penetrating oil to loosen them. Once the water is off, plug your sink drain to ensure you don’t lose any small parts as you work.
Next, you’ll need to figure out which of the two valves under your sink is leaking. To do this, turn off the cold-water valve first and see if the leak stops; if not, then you need to shut off the hot-water valve. After this, you can use a screwdriver to remove the decorative cap on your faucet handle and expose the top-mounted handle screw. Be careful not to drop any small pieces as you do this, and place the parts aside in the order they were removed so they’re easy to reassemble.
Remove the Handle
Most faucets have a decorative cap on the end of the handle. Try to pry this off with a screwdriver, if possible. It may be stuck due to mineral buildup or corrosion. If it won’t budge, apply some penetrating oil to the area and give it a little time to work. Gently tapping it with a rubber mallet may also help to loosen the handle.
After the handle is free, you should be able to see the stem and the adjusting ring that holds it in place. You can replace this part if it’s worn, especially if the handle is leaking at the base. It’s a good idea to replace the O-ring while you’re at it, too.
Depending on the type of faucet, you may need to remove other parts before you can take off the handle. For example, cartridge and ceramic-disk faucets require removing the escutcheon caps (also called bonnets) to expose the cartridge or disk cylinder. For compression faucets, you may need to remove the valve stem or a washer.
If the faucet has a set screw on the side of the handle base, you can remove it by unscrewing it with a wrench or hex key. If the faucet doesn’t have a set screw, there is no need to remove the handle. Just make sure to turn the water supply off before attempting any repairs. You’ll want to plug the sink drain as well, so you don’t lose small pieces down the drain. When you’re done, put the handles back on, turn on the water, and test for leaks. Then, if necessary, you can begin working on the plumbing repairs. If you’re having trouble finding replacement parts for your faucet, try a local home improvement center or a plumbing supply specialist.
Disassemble the Faucet
Depending on your faucet model, there may be additional components to remove. You will need to examine each one, as some may be worn or damaged and may need to be replaced. Use a mild detergent or vinegar solution to clean the faucet parts, including the cartridge, washers, O-rings, and seals. This will help to remove any build-up of minerals and residue that could affect the faucet’s performance.
If your faucet has a decorative cap, pry it off to expose the handle screw. This may be an Allen screw, a Philips screw, or a set screw that needs to be removed with a handle puller. Once the screw or set screw has been removed, lift the handle off the faucet. If your faucet has a dome assembly under the handle, you will need to unscrew it with large slip-joint pliers. Once you have removed the dome, you will be able to remove the metal handle adapter and the plastic pivot stop. At this point, you can either insert a new cartridge or replace the old one. If you are replacing the cartridge, it’s a good idea to remove the brass retainer clip first, as this will make it easier to install the new cartridge.
With the handles and escutcheon out of the way, you should be able to see the mounting nuts that hold the faucet body in place. Loosen these with an adjustable wrench or a pair of channel-type pliers. Once the nuts are removed, the faucet body should usually fall out of the sink, but be careful not to drop it on the floor or cabinet underneath. Before you reassemble the faucet, test it to ensure that the handle moves smoothly and that hot and cold water are properly mixed.
Inspect the Parts
Using a clean cloth soaked in water and white vinegar, gently wipe away any grime or mineral build-up on the parts of your faucet. This is especially important for older faucets, where a rough surface on the valve seat or cartridge can cause it not to fit properly and seal the way it should, which can lead to leaks.
After cleaning, you can see more clearly whether there are any cracks or other damage that would require replacing the part. This is also a good time to clean the aerator, which mixes air and water so that you get a smooth flow from your faucet. This can help you save on your utility bills by reducing the amount of water you use.
If your faucet is leaking around the handle, it’s likely a problem with the spindle or “packing.” The spindle is the metal tube that extends down into the spout. Older faucets had packing, which was a string-like material that wrapped around the spindle inside the “packing nut.” Newer faucets have O-rings, which are easier to replace and last for years. It’s worth spending a little extra money on a high-quality replacement to avoid future problems with your faucet.
If you have a ceramic disk faucet, you might have a metal escutcheon cap directly under the handle that’s screwed on. Remove this with a wrench or screwdriver, then you should be able to unscrew the handle itself and the screw that holds it on. You may need to loosen this screw with penetrating oil first. Examine the screw and the washer, replacing them if they’re worn out or damaged. After this, you can reassemble your faucet and turn on the water supply to test it for any remaining leaks.
Replace the Parts
Once you’ve identified the faulty part, it’s easy enough to find replacement parts for most faucets. Some will need to be special order items, but others are available in ready-made kits at most hardware stores. Make sure to choose a kit that specifically mentions your specific faucet brand and model to be certain that the replacement part is an exact fit. Once the new part is installed, turn the water back on and check for leaks. If you don’t see any, your repair job was successful.
If a faucet is leaking around the handle, there may be an issue with the O-ring or the washers. These are thin disks of rubber or metal that act as a cushion and seal between various parts that come into contact with each other, such as the valve stem and the handle. Over time, these can wear out and cause leaks. If you suspect that the O-ring or the washers are causing your faucet to leak, replace them.
After you’ve removed the handles, take a look at the valve body to see what other replacement parts are required for your specific faucet. Some models have cartridges, while others have a cam and ball or a ceramic-disk cylinder. Each type requires different tools to remove the decorative caps and expose the corresponding parts.
If your faucet is a cartridge, remove the cap and collar with channel locks or a toothless wrench to get to the cartridge. Then, take out the cartridge and remove the retaining clip to pull out the valve seat. You can also sand the valve seat with emery cloth and then use a plumber’s tape to repair it. If the seals are leaking, you can replace them with fresh neoprene seals or use distilled white vinegar to clean out the cylinder openings and then replace the seals.